For the month of October we got to take on one of many bakers’ deepest, darkest kitchen nightmares : macarons. Our talented bakers Korena from Korena in the Kitchen and Rachael from pizzarossa made the intimidating task of mastering these French beauties a breeze.
So this may seem a little controversial, but I have come to the conclusion that macarons are a bit of a rort. This is not my first macaron rodeo so i’ve had a little experience with baking these finnicky little biscuits and I still think that the amount of time and emotional energy that is invested in these, albeit delicious, little sweets is a bit absurd. I know that there is a scientific method that we follow, but the number of variables that are utterly out of the home baker’s control and the significant impact that these variables have on the final product mean that I mostly put these in the ‘too hard basket’. For the sake of this challenge though, I dusted off my macaron stencil for a final go at them.
I’ve had zero success with the french method, so Rachael’s Italian Method was my chosen recipe. I know its all voodoo but I find something comforting in the stability of the italian meringue. But really, we all know that once that tray is in the oven, all you can really do is pray to the Mac Gods and hope that they are feeling benevolent and will bestow your little macs with some tiny little feet to stand on.
 I decided to fill mine with a chai buttercream
so I flavoured a normal buttercream recipe with chai powder
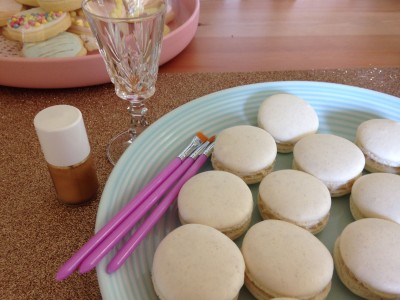
(you can see how some of the tray behind went wonky and refused to pop up their sweet little feet)
 but this one was pretty damn footsy!
and I was feeling a little bit artsy
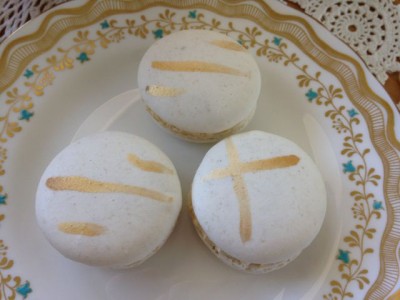
so I decorated the top shells with some edible gold paint
et voila!
So, lovely readers, how have your adventures in macaron making been? Many successes? Or is the formula to footed macs still as elusive as ever?
Macaron Shell Ingredients
140g ground almonds, room temperature
140g powdered (confectioner’s) sugar
100g egg white (from approx. 3 eggs), room temperature, divided 50/50
100g granulated (white) sugar
40g (weight) water
Method
1. Mix the ground almonds and powdered sugar together in a bowl, then grind in a food processor until you have an extra fine texture. You may need to do this in batches, depending on the size of your food processor.
2. Sift into a large bowl, putting any bigger pieces of almond back into the food processor to re-grind.
3. Add 50g egg whites and mix thoroughly into the almond mixture. Set aside.
4. In another bowl, or the bowl of a stand mixer, scrupulously clean and free of any oil or egg yolk, beat the other 50g egg whites to stiff peaks.
5. Meanwhile, put the granulated sugar and water into a small heavy-based saucepan and heat on medium-low to 118°C / 244°F, without stirring.
6. While whisking constantly on low speed (to avoid splashing hot syrup), slowly add the cooked sugar mixture to the beaten egg whites, pouring it down the inside edge of the bowl. You’ll get a bit of it hardening on the side of the bowl, but that’s okay – just leave it there.
7. Whisk at high speed until the mixture is cool, about 3 minutes. About 1 minute before the end, you can add food colouring, if not done at the almond paste stage. The mixture should increase in volume and become firm and shiny, and it should be thick and marshmallowy when you lift the whisk.
8. Scrape the meringue onto the almond mixture and incorporate with a rubber or silicone spatula. You do actually want to get a lot of the air out of the mixture – you do this by folding and squashing the mixture against the side of the bowl, rotating the bowl a quarter turn with each fold. Be sure to firmly scrape the bottom of the bowl with the spatula, so you don’t leave a layer of almond paste there. Mix until you have a homogenous batter that runs from the spatula in a thick ribbon.
9. Transfer the mixture into a piping bag fitted with a 7 – 9mm / #10 – #12 plain round tip (this is best done in two batches, so you don’t overfill the bag). Pipe 60 equally sized rounds, about 4cm / 1 1/2” in diameter, in staggered rows onto the prepared sheets. Hold the piping bag upright with the tip just above the sheet and pipe without pulling upwards or swirling in circles, so the batter comes out in a round blob around the tip, and give a little sideways flick at the end to break the stream.
10. Tap the baking sheet firmly on the bench several times to release air bubbles and obtain a smooth surface. If you have any tips sticking up, press them gently down with a damp fingertip.
11. Leave the tray to rest at room temperature for at least 20 minutes until a slight skin forms. If you touch it, it should be only just tacky.
12. Meanwhile, preheat oven to 150°C / 300°F / Gas Mark 2. Bake the macarons in the centre of the oven for 18 minutes (20 minutes if using cocoa in the shells), one sheet at a time, turning the sheet half-way.
13. Remove from oven and remove the parchment from the tray with the shells still on it and place on a cooling racks for at least 30 minutes, until completely cool, then remove macaron shells carefully from the parchment.
Chai Spiced Buttercream Ingredients
125g unsalted butter (softened)
1 1/2 cup icing sugar
2 tbsp milk
1 sachet chai powder (1-2 tbsp depending on your taste)
Method
1. Beat the butter and icing sugar until combined
2. Add the milk, one tablespoon at a time and beat on high until light and fluffy
3. Mix in the chai powder
4. Fill those macarons!


You are absolutely right about macarons being finicky, but I’m glad you decided to participate anyway. I like the edible gold dust touch!
Thanks for hosting Korena!
Oooo, love the chai buttercream! They look wonderful!
Thanks Marcellina!
I’m really glad you decided to bake them anyway, because they look divine! 🙂
I think yours look gorgeous! I agree that they are a finicky little cookie but my family loves them whether they turn out right or not. In fact, I can hardly keep them away from the shells in order to fill them. I like your flavor choice and the gold finish. Perfect for autumn!