Hello Sunshine: Gluten Free Lemon Cake

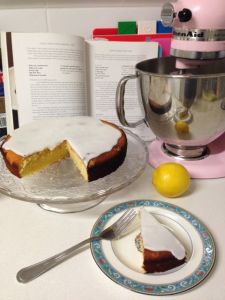
Oh baby. I had a slice of delicious lemon drizzle cake from Flour and Stone ages ago and became so obsessed with making it at home that I must have gone through half a dozen recipes before I got to one that I was happy with. Its like sunshine in a cake. This is not at all a recreation but just a damn good lemon cake which I think should be a staple in any baker’s repertoire. I mean, look at it…

A True Love of Mine: Gluten Free Lemon Cake

Delicious, moist cake with a super tangy, sugary icing. As if your mouth isn’t watering just thinking about making this. P.s. like how arty I am now? With that little lemon in the shot as well as the cake? Yeah, im a real pro.

Ive re-discovered the Nigella Lawson cookbook How To Be A Domestic Goddess and have a few more recipes coming from her in blog posts to come. And yes, they will come. Now that i’m on holidays and have finished a super stressful (but very rewarding) year, I have lots of time for blogging. Fourth post this month peeps! Yeah!

A True Love of Mine: Gluten Free Lemon Cake

The original recipe just uses normal flour but its such a small percentage of the whole thing that I swapped it with gluten free flour. That way I could make it for my friend’s birthday. I’m still a little wary of the ability of gluten free flour to properly emulate non-gf flour so i’m not quite game to use it in large quantities say for cookie dough or the like. Baby steps for me.

A True Love of Mine: Gluten Free Lemon Cake

As you can see, the cake is super dense so not for the faint of heart. But, for all its density it is wonderfully moist and the tangy icing sets it off beautifully. The best thing about this is that you can adjust the lemon flavour to your liking just by tweaking how much zest and juice you add. Although, I tend to think the more lemon the better. But hey, do what you like! I’m so glad that I re-discovered this baby as there had definitely been a bit of a citrus drought in the old Casa KB and this cake set us back in balance. And a slice counts as a serve of fruit doesn’t it?

So my lovelies, what old favourite have you re-discovered recently?


Hello Sunshine Lemon Cake (adapted from Nigella Lawson’s Damp Lemon and Almond Cake)

Cake Ingredients

225g soft unsalted butter

225g caster sugar

4 eggs

50g plain gluten free flour

225g ground almonds

zest and juice of 2 lemons

Lemon Icing Ingredients

2 cups icing sugar

1 scant tbsp warm water

lemon juice to taste

Cake Method

1. Cream butter and sugar until super super pale

2. Beat in the eggs, one at a time, adding a quarter of the flour after each addition

3. When everything is incorporated, gently stir in the ground almonds and lemon zest and juice

4. Pour mixture into a 20cm round cake tin and bake for roughly an hour at 180 degrees celsius (check after about 40 mins and if the cake is browning too quickly, cover with alfoil)

5. Boom! Moist and delicious cake. Ready for icing when its cooled.

Icing Method

1. Sift icing sugar into a bowl

2. Stir in lemon juice

3. Add the water in small additions until icing had reached desired consistency. You want it thick and lava-like rather than runny. That way it will coat the top of the cake but give you a nice thick layer of zingy icing.

4. Enjoy!

Little Drops of Sunshine – Lemon Curd Tartlets

When the mercury hits 30+ degrees (celsius, my European friends) you know that Summer is well and truly here. Despite the fact that technically, it is still Spring. So to celebrate the sunshine and the general laziness that long beautifully warm days brings, I thought I would make some easy peasy lemon tartlets.

If you think these babies are looking a little on the large side, take not that they are sitting in a mini muffin pan not a normal sized one

What really started this off was a little road trip I took a few weeks ago to the NSW Southern Highlands. It was a great weekend away with great company, amazing food, lots of antique shops and second hand bookstores. The first place we explored was Berrima which is a pretty little town that has a bit of everything – history, beautiful flowers and gardens, food and knick knacks. I was also surprised to come across a working jail which I am going to request if I ever get convicted of a crime. I might even plead guilty to something I didn’t do if I could be guaranteed I would serve my time out at Berrima such is the (external) beauty of the sandstone building and splashes of bright tulips. Lets hope it never comes to that!

So after I had pondered my career as a criminal mastermind and thought through my Plan B, we made our way to a store called the Little Hand Stirred Jam Shop. With a name like that how could you resist? Lucky I succumbed to my frivolous whims as I left the store with these

Lemon Butter and Creamed Honey.

Far out brussle sprout.

Show me a person who doesn’t like either of these and i’ll show you a fool.

Fool I tell you!

A bottle of sunshine.

And Bronze at the Sydney Royal Easter Show! Hooray!

Although if this baby only won bronze, I desperately want to try whatever won silver and gold, they must be like liquid crack.

All you will need for this recipe is three things. A packet of Butternut Snap Cookies, a jar of Lemon Butter or Lemon Curd and a mini muffin pan. You can use chocolate to decorate them but it isn’t strictly necessary.

Pop a cookie on the top of an empty muffin hole and place the tray in the oven for 5-7 minutes.

When they are soft, make a light impression with a tea spoon but be careful that you don’t break the biscuit. The place the tray in the fridge until the biscuits are hard again.

Once the biscuits are cooled, spoon the Lemon Butter on top until they are filled to your satisfaction. Then place back in the fridge until they are set.

At this point you can pipe some chocolate on top of your tarts, I just melted some dark chocolate and added a little glycerine to make it more pipeable.

Cute!

Quite simply, they are little mouthfuls of happiness.

I adapted the recipe from this one  although if you follow the link you will see that my laziness is incredible as the recipe was originally one for quick and easy lemon meringue pies. Except that I couldn’t be bothered with the meringue. But I think these are just as tasty as a snappy citrus tart!

So,  my lovelies, what short cuts do you take in the kitchen? What can you never be bothered to do?


Warm Lemon Curd Souffles

Now Donna, I never thought I would say this but while I will always love you with your fail safe and amazing desserts, you have been outdone. I have discovered  The Saint. And of course, I am referring to that paragon of amazing English cooking, Saint Delia. The story goes a little something like this.

My good friend Helen the Melon lent me several books and magazines a few weeks ago to help me with my quest to cook a terrific pudding (and yes, the magazines were Donna Hay, she still has a place in my heart!) Among the collection were the Delia’s How To Cook books One Two and Three. No matter how much I learn about cooking I always feel that theres still so much I dont know. So I was delighted to see that Delia’s books were a comprehensive guide to the absolute basics of cookery. Perfect for beginners, Book One’s opening chapter is “All About Eggs.” Hooray! I love eggs!

So I dutifully set about reading and testing, testing and eating, eating and, well, more eating. Until I reached a certain recipe that had me salivating like Pavlov’s Dog. That recipe was Warm Lemon Curd Souffles. My love of lemons has been well documented in this blog and its not often that I can return from the supermarket without one or two lemons. They just look so damn tasty at the moment! But despite this enduring love of citrus, I was apprehensive, for I had NEVER tried to make a souffle before and their reputation for being fickle and deflating had far preceded them.

mmmmmmm lemon curd…

With the help of Saint Delia, I rallied and attempted these amazing desserts. I followed all the instructions to the letter, popped them in the oven and crossed my fingers and my toes. I suspect my sister may have also had her fingers crossed. Maybe it was all that crossing, but when I took them out they were BLISSFULLY risen and utterly delicious! Beautifully puffed souffle on top, gorgeous creamy layer of Lemon Curd on the bottom, what more could you ask for? Except for more please!! If you try no other souffle recipe in your lifetime, you must try this one.

yummoriffic!

P.s. I did have some difficulty with my grated lemon zest being quite chunky, can anyone recommend a fine grater that is good for zesting?

Warm Lemon Curd Souffles – From Delia’s How To Cook Book One

Ingredients – For The Lemon Curd

The grated zest and juice of one small lemon

1 large egg

40g caster sugar

25g cold unsalted butter, cubed

1 tsp cornflour

Method – For Lemon Curd

1. Lightly whisk the eggs in a small/medium saucepan

2. Add the rest of the ingredients (only the lemon curd ingredients!) and place the saucepan over a medium heat

3. Whisk the mixture continuously using a balloon whisk until it thickens (about 3 mins)

4. Lower the heat to its minimum setting and let the curd simmer for 1 more minute, whisking all the time

5. Remove from heat and divide the curd between the bases of four ramekins (Delia says to use ramekins with a base diameter of 6cm and a top diameter of 7.5cm. I just used ones that I thought would work!)

Ingredients – For the Souffles

3 large eggs

Grated zest and juice of one medium lemon (should be about 2 tablespoons of juice)

50g caster sugar (Delia specifies Golden Caster sugar, but I couldn’t find any and normal seemed to do the trick)

1 dessert spoon of caster sugar

Method – For the Souffles

1. Separate the eggs putting the yolks into a medium sized bowl and the whites into a larger bowl

2. Whisk the whites until they reach the stiff peak stage (about 4-5 mins depending on what whisking method you use)

3. Add the dessert spoon of sugar and whisk for 30 seconds more

4. Add the zest and lemon juice and the rest of the sugar to the yolks and whisk briefly

5. Take a tablespoon of the whites and fold into the yolks mixture

6. Gently folk in the rest of the whites being very careful not to knock the air out of the mixture

7. Spoon the mixture into the prepared ramekins, piling it high like a pyramid. Run your finger around the inside rim of each ramekin (this will help prevent any of the mixture leaking out around the sides)

8. Place the ramekins on a baking tray and bake on the centre shelf of the oven for 15 mins on 170 degrees celsius (I only baked them for about 8 minutes, use your judgement and when they are nice and golden on top, take them out)

9. Let them rest for about 5 mins before serving to allow the curd to cool a bit

10. EAT EAT EAT!

Daring Bakers’ English Pudding Challenge (April 2010)

The April 2010 Daring Bakers’ challenge was hosted by Esther of The Lilac Kitchen. She challenged everyone to make a traditional British pudding using, if possible, a very traditional British ingredient: suet.

I bought my first pudding basin last christmas because I had been charged with the task of making the Christmas Pudding. Now, I absolutely loathe the traditional fruit pudding so I figured that I would make it the only way I KNEW I would like it. With chocolate. Not traditional but very tasty!

I was very excited when I saw that my very first challenge with the Daring Bakers would allow me to use my pudding basin again. Ive never used suet, ive never steamed a dessert, in fact, im not really sure ive ever steamed anything. All ingredients and cooking methods I was new to. Bring it on!

I decided to make the Sussex Pond Pudding as I love lemons and the lemons are looking particularly lovely this season. The idea of steaming a pudding with a whole fruit inside it was also intriguing. I began by sourcing suet mix, which I found at my local supermarket in a box in the baking aisle.

I made the suet pastry according to the instructions on the box. very easy and straight forward.

Lined my pudding basin. (Yes I used kitchen scissors to trim the pastry!)

Added the cubed butter and demerera sugar

Look! A lemon!

Hid the lemon below lots more butter and sugar (possibly a little more than required by the recipe, but since when has extra butter and sugar been anything but good?)

Pop the lid on!

This part I thought would be very difficult, but it turned out pleating the foil and tying it with string was quite easy. My basin didn’t have a lip on it but the string never failed.

I made an impromptu trivet out of scrunched up aluminium foil and plunged by pudding into the boiling water!

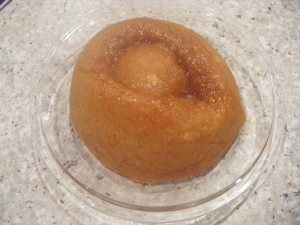
My pud! After 3 and a half hours of steaming. To be honest, I would probably steam it for another couple of hour as its not as golden as I would like.

Another pud! Actually its the same one but de-basined. MMMmmmm….

You can see the lemon in the middle there! Oozing lemony sugary sauce….

Overall, it turned out ok. Some of the pudding was absolutely amazing. The pastry was flaky and tasty with some beautiful lemony sweet sauce. The only problem was that parts of the lemon turned out quite bitter and that tended to overpower the sweetness of the dish. I think that could be overcome by steaming the pud for a few more hours.

While I havent been able to post any more of my pudding attempts, this challenge has certainly inspired me to get creative in the kitchen. Expect more puds, savoury and sweet, large and small over the coming weeks! This was a great challenge that introduced me to many things i’d never think of trying on my own. Thanks Esther, for a truly inspiring challenge!!

So my lovelies, what puddings have you tried to make? Did they work? I think my next attempt is going to be this Very Chocolate Pudding. Just for something different…

Sussex Pond Pudding Recipe – As seen at The Daring Kitchen

Ingredients

1 box suet mix

120g Demerera Sugar

120g Unsalted Butter

1 Large Lemon (try to get unwaxed and thin skinned lemons)

Method

1. Make the pastry according to the instructions on the box

2. Grease your pudding basin with butter and line it with the pastry

3. Cut the butter into small cubes and place half in the basin and cover with half the sugar

4. Wash and dry your lemon, and place it on top of the butter and sugar

5. Cover with the rest of the butter and sugar

6. Cut a disc out of the remaining pastry and cover the pudding filling, folding around the edges of the pastry in order to seal it well

7. Steam for 3.5 hours (I would probably try steaming it for another couple of hours next time)

MAKE SURE YOUR POT DOES NOT BOIL DRY!

8. When you invert your pudding basin to get your pudding out, make sure you do it in a rimmed dish as the sauce may leak out

9. Enjoy!