Personal Challenges: The Macaron

Everyone has at least one irrational fear. In my case, the list is quite long. Fear of sharks when I swim out so far at the beach that I can’t touch the bottom, fear of the dark (particularly when i’m turning out all the lights before I go to bed at night) and, on a lesser scale, there are quite a few recipes that i’m terrified of trying. One of those recipes is macarons.

The much heralded successor to the cupcake with its delicate outer layer and moist, flavoursome innards has been on my ‘to bake’ list for quite a while. Ive had several unsuccessful attempts and watched others fail dismally which has not helped my confidence. So, this year I thought I would put it on my resolutions list and take small steps throughout the year to achieve it. Last holidays, I went to a small class held by a friend of a friend, I tried the Donna Hay box mix (which were surprisingly good) and I quizzed friends who had been successful in making these fickle treats. Unfortunately, everyone seems to have a different method and a slightly different mix. Everyone seems to swear by contradictory key parts of their recipe which just ends in a sad puddle of confusion and failure for the home cook like me.

So I figured that I would just bite the bullet and begin with the recipe of Adriano Zumbo. Having already tried a different recipe from the book (It Mayo Shock You Cake) and seeing that the macaron recipe had no freaky ingredients and was similarly straightforward, I was quite hopeful. The only thing that this recipe requires that you might not have stocked in your pantry is the powdered egg whites. I bought a big jar of these from The Essential Ingredient in Rozelle a while ago which I think will keep me stocked for many many many batches of macarons.

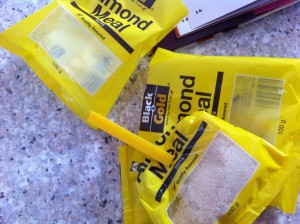
Other than that all you really need is egg whites, almond meal, icing sugar and a bit of water to make your macarons. In terms of specialty equipment, you really need a stand mixer or a second pair of hands as this recipes uses the italian meringue method which involves pouring the boiling sugar syrup into your egg whites mix while you are mixing. If you have a stand mixer you can do this by yourself but if you are using a hand mixer you will need someone else to help you. A sugar thermometer is also necessary to make sure your syrup is at the right temperature before you add it to the mix.

After you’ve done all your mixing you just need to pipe out your mixture onto baking paper and leave it alone for 30 mins. The little tips left from piping will disappear during this time as the mixture settles and forms a skin on top. You can also give your tray a few good whacks on the counter top to make sure that there are no pesky air bubbles lurking in there.

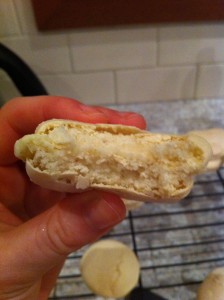
And once they are cooked they will have smooth tops and cute little feet popping up beneath them. Yay!

I chose to fill my macarons with delicious vanilla bean buttercream using Heilala Vanilla. This vanilla bean paste is amazing as it delivers an intense burst of vanilla flavour. It is quite expensive but it uses much less sugar than the varieties sold in the supermarket and is a much more pure vanilla flavour. You can buy it here for $23.50 for a jar of 100ml that will last you a very long time! It’s the kind of thing that I would LOVE to be given for a birthday or christmas or a ‘just because’ kind of gift.

Then all you need to do is pipe your filling onto one macaron

and sandwich together like so!

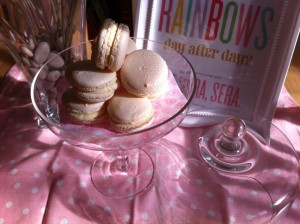
nom!!!

and so, I have overcome my fear of making macarons! Hooray!

So tell me, my lovelies, what fears do you have? Is it something totally irrational?

Macaron Recipe – from Zumbo 

Ingredients

300g almond meal

300g icing sugar

110g egg whites

300g caster sugar

75g water

2g powdered egg whites

110g egg whites

Method

1. Combine almond meal and icing sugar in a large bowl. Sieve the mixture thoroughly at least twice.

2. Put the egg whites into the bowl of an electric mixer with the whisk attachment

3. Put the caster sugar and water into a small saucepan and place over a low heat. Stir until the sugar has dissolved

4. Once the sugar has dissolved, increase the heat until the mixture is boiling and reaches 118 degrees celsius

5. When the sugar syrup is close to the required temperature, place the powdered egg whites into the mixer bowl with the real egg whites and mix until frothy

6. When the sugar syrup is at the required temperature, pour the sugar syrup in a slow and steady stream down the inside of the mixer bowl while the machine is still mixing. Turn the speed up to high and mix for about 8 minutes (or until the mix has gone from very hot to just warm)

7. Stir the extra egg whites into the sieved almond and icing sugar mix

8. Add the meringue mixture to the almond mixture and fold through. Once it is all combined, continue to fold until the mixture has loosened and is more ‘lava like’. You don’t need to be gentle here like you would with a normal meringue, the aim is to soften the mixture rather than to keep all the air in it

9. Pipe 4cm circles of mixture onto a baking tray making sure that there is enough space between each macaron as they will spread slightly

10. Leave the trays for 30 mins to form a skin on the top. This will be how your macarons gain their ‘feet’ as the skin makes sure that they rise evenly and pop those little feet out the bottom (after 10 mins of resting, turn your oven on to 135 degrees celsius)

11. Place trays in the oven for 16 minutes or until they have a firm outer shell. Remove from the oven and set aside for 2 minutes. Carefully remove one macaron shell from the tray to check if the base is cool and dry. If it is still sticky on the bottom, put the tray back in the oven for another couple of minutes. When they are done, cool them on the trays.

Vanilla Bean Buttercream Filling – From Raspberri Cupcakes

Please click through to this lovely girl’s beautiful blog to find her delicious recipe.

Love is all around me

When I was growing up, my favourite movie was Four Weddings and a Funeral. I thought it was hilarious and loved that the first word to be uttered in the film was a profanity. Followed by a liberal scattering of profanities throughout the film. I loved the music, I loved the actors and I loved the storyline. I did think it was strange though, that Hugh Grant says midway through the film that he is pleased to be spending his first Saturday in forever NOT going to a wedding. Having never been to a wedding myself I was awed at the number of weddings he must have been to. Where were all these people getting married? How do you even know enough people to be spending all this time at weddings? Seeing as the actors were much much older than me, I figured I would never have to worry about this (at least not for many many years). Until a few years ago.

It started with a close work colleague. Then a friend of my sister. Then a friend of my boyfriend. Then cousins, friends, acquaintances were all getting married! Makes me wonder what i’ve been doing with my time…

Clearly I haven’t spent my nights and days becoming a Piping Pro…

But I did think it was time to conquer my fear of covering a whole cake in fondant! Hooray!

And what better time to do it than to celebrate the engagement of my old high school friend Viv? As I missed the dinner where she made the engagement announcement, I thought a congratulatory cake would be in order. Turns out it’s not a scary or difficult as it seems (hmm am I about to use fondant as a metaphor for marriage? I hope not). As long as you leave yourself plenty of time and resign yourself to making quite a few mistakes, the road to a pretty fondant covered cake is relatively smooth sailing (well I didn’t say I wouldn’t mix my metaphors).

First you have to put on your funky apron

Yes, I bake in my pjamas…

Then you must bake a cake. Any kind of cake really. It should be relatively sturdy though so probably not a sponge. I baked a vanilla cake from this Magnolia Bakery recipe and I only baked a tiny one because if it was a screw up, at least it wouldn’t be a huge screw up!

A layer of buttercream goes between the cake and the fondant (you can use ganache if you like). I used the Magnolia Bakery buttercream recipe but I substituted the vanilla essence for musk flavouring. Far out… musk buttercream is one tasty icing!

After colouring and kneading your fondant, roll it out and drape it over your cake making sure you smooth it over the top and down the sides. Press firmly to make sure the fondant sticks

Trim off the excess (more neatly than I did!)

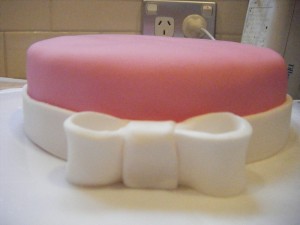
And decorate however you like. I attached a strip of white fondant around the base of the cake then folded two loops and joined them in the middle with a third piece of fondant to make a bow.

Now, I wish I had stopped there. But no, I was on a roll and figured I would try my hand at a little piped message on top of the cake. However, with my short memory I forgot how bad I am at piping. So the end result looked a little something like this…

I now realise that tiny cake + large piping tip x enormous word = disaster

While it was not bad for a first attempt, I will endeavour to do better! And it did celebrate the occasion nicely.

So a huge congratulations to my beautiful friends Viv and Louis, I promise to make you a prettier cake in the future!!

Vanilla Icecream Pudding Surprise! (Another belated christmas post)

Since I made my confession about strawberries I have been feeling lighter, less freakish, so good in fact that I feel I must make another confession. I love everything that comes with a traditional Christmas – turkey, ham, roasted veggies (particularly roasted veggies! mmmmmm…) cranberry sauce, mustard. Christmas lunch and dinner leaves me completely full and happy. However, and be prepared because you may not believe me when I say, I almost never eat dessert at Christmas.

*whistles*

Yes, you read that correctly. This is the only meal all year that I do not finish with something sweet. Why? I don’t like fruit pudding, I don’t like fruit cake, I don’t like mince pies. It may seem like I don’t like fruit full stop, but that is not the case at all! It’s something to do with the combination of dried fruit, mixed peel and booze that just puts me off Christmas desserts. So this year, when I was given a mission by the mothership to make Christmas dessert, I decided to make a pudding but not of the traditional kind.

Enter…

Vanilla Icecream Pudding Surprise!

One of my birthday gifts from my beautiful mother was a Cuisinart Icecream Machine. I had been trying to make a decent icecream in it since November, but nothing was going to plan. Icecreams were too eggy, too icy, not setting, just plain sucky. This was going to be a Christmas showdown between me and that icecream. Armed with a recipe from the brilliant Guillaume Brahimi, I felt up to the challenge.

I followed the recipe exactly (I like to cut corners and substitute a bit here and there, but not this time baby!)

It looked pretty good churning away so I got to work on the ‘surprise’ part of the dish

What else would it be?

Guillaume’s recipe uses Mars Bars and Toblerone but I wanted to add the Cherry Ripe to make it a bit more festive, and because they were sitting in my cupboard begging to be used. And who can ignore a cry for help from a poor little chocolate bar? I only used 1.5 bars of each type of chocolate 1. so I could snack without detracting from the finished product and 2. because, well, it was just too much to put 6 full bars of chocolate in

I got a-chopping (and a-snacking!)

When the icecream was churned, I added the chocolate and poured it into the pudding basin

don’t forget to line your pudding basin with cling wrap so that you can get your pudding out when you want to eat it

you can use the overhang to cover the icecream to protect it in the freezer

Like this! Then pop it in the freezer overnight to set properly

Even though I lined the pudding basin with cling wrap, I still needed to dip the bottom of the bowl in hot water for a few seconds to help it come out properly. I made a chocolate sauce to go with the pud because it didnt feel like the usual custard and cream would be appropriate. However, I won’t post the recipe because although it was ok, it wasnt amazing and therefore not blog worthy.

mmmmm pud

yummo!

The icecream was smooth and creamy and vanilla-y and, studded with chocolate it was the perfect end to christmas day.

Although I made this recipe as a delicious christmas pud, you could do it in any shape or with any surprise. Im thinking M&Ms, nutella, snickers, oreos, the possibilities are endless! It’s almost like a Cold Rock at home. Mmmmmm…

So, my lovelies, if you made this icecream, what surprise would you add?

Vanilla Icecream Pudding Surprise – Adapted from the Christmas Tree Icecream Recipe by Guillaume Brahimi (published in the Sydney Morning Herald Good Living December 14, 2010)

Ingredients

375ml milk

375ml pouring cream (I used pure cream)

3 vanilla beans

8 egg yolks

150g caster sugar

1.5 Mars Bars (roughly chopped)

1.5 Toblerone bars (roughly chopped)

1.5 Cherry Ripe bars (roughly chopped)

Method

1. Bring the milk and cream to the boil

2. Slice the vanilla beans in half lengthways, scrape the seeds out and add to the milk and cream

3. In a separate bowl, whisk the egg yolks and sugar until well combined, then gradually add a third of the hot milk mixture and combine. Do this very gradually so as not to cook the eggs!

4. Put the egg and sugar mixture back into the pan with the remaining liquid and stir over medium heat until the custard reaches 80-85 degrees celsius or until it thickens enough to coat the back of the spoon

5. Immediately remove from heat and strain the mixture into a bowl (I had my bowl in an ice bath to make sure the mixture absolutely stopped cooking) and chill overnight

6. Churn in an icecream machine according to the manufacturer’s instructions. While the icecream is churning, line your mould with cling wrap leaving enough around the edges to fold over the top of the icecream

7. Once the icecream has reached desired consistency, stir in your chocolate and pour into the mould, folding the cling wrap over the top to protect it from the freezer. Freeze overnight or for 24 hours until set

8. To remove, dip the bottom of the mould in hot water for a few seconds and use the edges of the cling wrap to lift it out of the mould. Drizzle with the sauce of your choice and enjoy!

Edible Christmas Gifts #1: Strawberry and Vanilla Conserve

I have a confession. It may shock you.

I don’t like strawberries.

Sometimes I feel like i’m the only person on the planet who doesn’t like fresh strawberries. Not dipped in chocolate, not with fresh cream on a hot summer’s day, not even freshly picked. I’ve never been able to figure out why. It’s not like my aversion to fresh tomatoes (which make me throw up), I just don’t like them. But here’s the kicker… I LOVE strawberry jam.

After buying Gifts from the Kitchen: 100 Irresistible Homemade Presents for Every Occasion by Annie Rigg, I decided that I was going to be making some delicious christmas gifts for my friends and family. Each year I try to make some jam, sometimes a success (2009 Blueberry Jam) sometimes a failure (2008 Peach and Nectarine Jam… and I use the word ‘Jam’ very loosely here). This year I was determined to try the old faithful Strawberry and Vanilla Conserve. The recipe was straightforward and very easy to follow and, unlike many other recipes, it did not make litres and litres of jam that required bottles and bottles to contain it. This recipe makes enough to fill 3 X 125mL jars and doesn’t require a giant saucepan.

Firstly, you must make sure that you sterilise your jars. Not necessarily as difficult as it sounds. I bought these jars for $5.95 (a tad expensive but they were all I could find at the time) from The Essential Ingredient in Rozelle.

They came with instructions on how to sterilise them, but here is how I do it. First I take the rubber seals off then I wash the jars in hot soapy water then pop them on a tray and into an oven heated at 200 degrees celsius for 20 mins. When the jars are cool I pop the seals in boiling water for 1 minute then stick them back on the lids. The recipe can be found at the end of this post, but let me walk you through it.

After sterlising your jars, you need to behead your strawberries.

MUAHAHAHAHAHAHAH!

And chop them up into tiny pieces. (about 550g of strawberries are needed)

Then pop 450g preserving sugar (I use the CSR because its the only one I can find, and it’s pretty good) along with the juice of one lemon and the seeds and pod of one vanilla beans in a large sized heavy based saucepan. (I used two vanilla beans because… well… I just love them)

Put over a low heat until the sugar has dissolved.

Add your strawberries and stir to make sure they are coated with the sugar mixture.

Leave to stand for around 1 hour so that the fruit can soften and release its tasty juices into the syrup.

Return the pan to a medium heat and cook at a steady boil without stirring for 20 mins or until it reaches setting point. Here are a few ways to tell if it has reached setting point. I prefer to use the chilled saucer method. (When I made this, I had to leave it for over 30 mins before it reached setting point, so if it takes a while, do not stress! Just keep testing every nowand then and be careful not to burn your jam.

When your jam has reached setting point, take it off the heat and pour it into your waiting jars.

Tah Dah! Fresh pots of Strawberry and Vanilla Conserve!

The jam will thicken after it has rested for a while, but the beauty of this recipe is that it tastes delicious so even if something goes wrong and it doesn’t set you can still use it as a sauce over ice cream or some delicious dessert. Mmmmmm!! Win win!

It is a relatively fuss free recipe due to the smaller yield so it is not too late to make this for someone for Christmas. Get cooking!

And, my lovelies, what kind of jam is your favourite? After trying Kaya and Champagne jelly, I am eager to try some other flavours!

Strawberry and Vanilla Conserve – Adapted From Gifts From the Kitchen by Annie Rigg

Ingredients

450g preserving sugar

juice of 1 lemon

2 tbsp water

1 vanilla pod (feel free to use more if you wish)

550g small, ripe strawberries (hulled and chopped)

Method

1. Put the sugar, water and lemon into a large heavy based saucepan or preserving pan. Split the vanilla pod and scrape the seeds into the sugar mixture. Add the pod and place over a low heat until the sugar has dissolved

2. Remove the pan from the heat and tip the strawberries in. Stir gently to coat the strawberry pieces in syrup then leave to stand for around 1 hr

3. Return the pan to a medium heat and cook at a steady boil for around 20 mins, or until it reaches setting point. Keep testing for setting point and don’t worry if it takes longer but make sure you resist the temptation to turn your heat on much higher or you might burn your jam on the bottom.

4. When the jam has reached setting point, take the pan off the heat and let the mixture stand for 10 mins to let the strawberries settle.

5. Pour or ladle the mixture into waiting bottles (it should take 3 and a bit 125mL bottles) and seal immediately. They will keep for months unopened in a cool, dark cupboard or up to 1 month in the fridge once opened.