Daring Bakers’ Chocolate Pavlovas Challenge (June 2009)

The June 2010 Daring Bakers’ challenge was hosted by Dawn of Doable and Delicious. Dawn challenged the Daring Bakers’ to make Chocolate Pavlovas and Chocolate Mascarpone Mousse. The challenge recipe is based on a recipe from the book Chocolate Epiphany by Francois Payard.

Ok. So you had me at “Chocolate”. Then you had me drooling at “Pavlova”. By “Mascarpone Mousse” I was on the floor in raptures! The Chocolate Gods are certainly smiling down on me.

As it needed time to chill, I thought I would make the Chocolate Mousse first. I did attempt to make my own mascarpone a day or two after the challenge was posted. While it went ok, I just didn’t have enough time to make enough for this recipe. Definitely something I’m going to do now that the holidays have started though!

Folding the chocolate into the mascarpone and cream mixture.

(I was so happy during this process I almost fainted!)

Next step was the Chocolate Pavlova. Now Pavs are a bit of an Australian specialty. Particularly after Donna Hay’s Pavlova was featured in one of the first episodes of Master Chef. While I have been experimenting with pavlova and meringue lately, I have to say that i’ve never tried a chocolate pav! Absolutely something that needed to be rectified!

Mmmm look at all that lovely cocoa, ready to be folded into the meringue mixture

It was all looking good. I shaped the mini pavs on a baking tray and it seemed as though I was traveling well until something knocked the wind out of my sails.

Horror! Pancake pavs 🙁

I’m not sure what went wrong with these but they just lost their shape. They tasted ok but were not what I was trying to do. So what do we do when something like this happens? Try, try again!

This time I tried shaping my pavs so that they would hopefully hold their shapes better

I’m finding it harder and harder to stop myself from eating the raw mixture. its just so damn tasty and don’t these just look so yummy? I was a little bit naughty and added some cornflour and vinegar on the advice of Womens Weekly. But hey, it worked!

Not only did they look yummy, but they were extremely successful! Yay!

Puffed pillows of pure pleasure.

Now, i’ve been a bit lame this month and somehow forgotten to take progress shots of my creme anglaise and mascarpone cream. Sorry! The process wasn’t particularly difficult or exciting, just a bit of stirring, a bit of sifting and a bit of folding. When I put it all together, I had something that looked like this…

and far out… it tasted gooood. With an emphasis on the “ooo”!

The best part was cracking the shell to get to all that chocolaty, marshmallowy goodness.

Yes, Chocolate Gods, I must have done something right. Word to the wise: you need a fork and a spoon for this one! I have so many different ideas of what to do with the chocolate pav, chocolate mousse and mascarpone cream. Expect some good things with these components in the next few weeks. Thank you Dawn, this recipe was both doable and delicious, not to mention inspiring! You are a star!

Now in conclusion, I want everyone to say with me:

Hooray for chocolate!

Chocolate Pavlovas with Chocolate Mascarpone Mousse and Mascarpone Cream Recipe

* I did have a few small substitutions (using orange juice instead of grand marnier and omitting the sambuca)

Chocolate Meringue

Ingredients

3 large egg whites

½ cup plus 1 tbsp (110 grams) white granulated sugar

¼ cup (30 grams) confectioner’s (icing) sugar

1/3 cup (30 grams) Dutch processed cocoa powder

Method

1. Place a rack in the center of the oven and preheat to 200º F (95º C) degrees.  Line two baking sheets with silpat or parchment and set aside.

2. Put the egg whites in a bowl and whip until soft peaks form.  Increase speed to high and gradually add granulated sugar about 1 tbsp at a time until stiff peaks form.  (The whites should be firm but moist.)

3. Sift the confectioner’s sugar and cocoa powder over the egg whites and fold the dry ingredients into the white.  (This looks like it will not happen. Fold gently and it will eventually come together.)

4. Fill a pastry bag with the meringue.  Pipe the meringue into whatever shapes you desire. Alternatively, you could just free form your shapes and level them a bit with the back of a spoon. (Class made rounds, hearts, diamonds and an attempt at a clover was made!)

5. Bake for 2-3 hours until the meringues become dry and crisp.  Cool and store in an airtight container for up to 3 days.

Chocolate Mascarpone Mousse

Ingredients

1 ½ cups (355 mls) heavy cream (cream with a milk fat content of between 36 and 40 percent)

grated zest of 1 average sized lemon

9 ounces (255 grams) 72% chocolate, chopped

1 2/3 cups (390 mls) mascarpone

pinch of nutmeg

2 tbsp (30 mls) Grand Marnier (or orange juice)

Method

1. Put ½ cup (120 mls) of the heavy cream and the lemon zest in a saucepan over medium high heat.  Once warm, add the chocolate and whisk until melted and smooth.  Transfer the mixture to a bowl and let sit at room temperature until cool.

2. Place the mascarpone, the remaining cup of cream and nutmeg in a bowl.  Whip on low for a minute until the mascarpone is loose.  Add the Grand Marnier and whip on medium speed until it holds soft peaks.  (DO NOT OVERBEAT AS THE MASCARPONE WILL BREAK.)

3. Mix about ¼ of the mascarpone mixture into the chocolate to lighten.  Fold in the remaining mascarpone until well incorporated.  Fill a pastry bag with the mousse.  Again, you could just free form mousse on top of the pavlova.

Mascarpone Cream

Ingredients

1 recipe crème anglaise

½ cup (120 mls) mascarpone

2 tbsp (30 mls) Sambucca (optional)

½ cup (120 mls) heavy cream

Method

1. Prepare the crème anglaise.  Slowly whisk in the mascarpone and the Sambucca and let the mixture cool. Put the cream in a bowl and beat with electric mixer until very soft peaks are formed. Fold the cream into the mascarpone mixture.

Creme Anglaise

Ingredients

1 cup (235 mls) whole milk

1 cup (235 mls) heavy cream

1 vanilla bean, split or 1 tsp pure vanilla extract

6 large egg yolks

6 tbsp (75 grams) sugar

Method

1. In a bowl, whisk together the egg yolks and sugar until the mixture turns pale yellow.

2. Combine the milk, cream and vanilla in a saucepan over medium high heat, bringing the mixture to a boil. Take off the heat.

3. Pour about ½ cup of the hot liquid into the yolk mixture, whisking constantly to keep from making scrambled eggs.  Pour the yolk mixture into the pan with the remaining cream mixture and put the heat back on medium.  Stir constantly with a wooden spoon until the mixture thickens enough to lightly coat the back of a wooden spoon.  DO NOT OVERCOOK.

4. Remove the mixture from the heat and strain it through a fine mesh sieve into a bowl.  Cover and refrigerate until the mixture is thoroughly chilled, about 2 hours or overnight.


Daring Bakers’ Croquembouche Challenge (May 2010)

The May 2010 Daring Bakers’ challenge was hosted by Cat of Little Miss Cupcake. Cat challenged everyone to make a piece montée, or croquembouche, based on recipes from Peter Kump’s Baking School in Manhattan and Nick Malgieri.

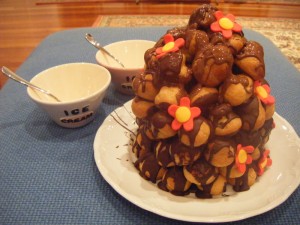
What is a Croquembouche without a little ice cream on the side?

So, this month I was EXCITED! I’ve wanted to make a Croquembouche for a very long time, and this challenge gave me both a reason to make it, and an amazing recipe to follow. I tested out the recipe numerous times, partly to make sure it would be perfect when I came to assemble my Croquembouche, mostly because I really wanted to eat Profiteroles!

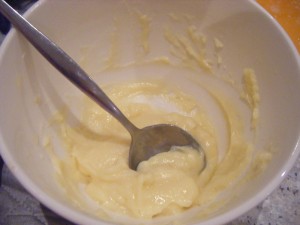
The creme patissiere is AMAZING. I ate it could eat it by the bowlful and I never had a problem with this part of the recipe. After I figured out that I could make meringues from the two egg whites left over I had ever more reason to love this recipe. Who can say no to custard and meringues? Not necessarily together…

Of course I used the spoon to put it into my piping bag, not scoff it alone….

I had a few teething difficulties with the Pate a Choux with my first two batches ending up flat and nasty. I followed the recipe to the T but still they wouldn’t rise. Until, I worked out that I needed to keep the pan on the heat while adding the flour. Apparantly the steam has something to do with reacting to the flour and making it rise blah blah blah. Whatever the reason, it worked like a charm. No more pancake profiteroles, puffy all the way!

Pre baking

Post baking! Look how puffy they are!

(Im not sure why the pic is so yellow, im still figuring all the photography out.)

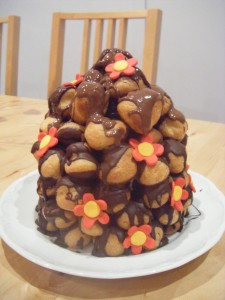
Now all that remained was to construct my mountain. With the help of a lot of melted chocolate and a plastic drinking cup, I finally had my Croquembouche! Hooray!

I decorated it with fondant flowers to add a bit of colour

Yes, I ran out of dark chocolate so I had to finish it off with milk. Quite a tasty adaptation!

Croquembouche Recipe – From the Daring Bakers

Creme Patissiere – Ingredients (I needed two batches of the original recipe so I have doubled the ingredients, halve them if you want to make less)

2 cups (450 ml.) full cream milk
4 Tbsp. cornflour
12 Tbsp. (200 g.) sugar
2 large eggs
4 large egg yolks
4 Tbsp. (60 g.) unsalted butter
2 Tsp. Vanilla

Method

1. Dissolve cornflour in 1/2 cup of milk. Combine the remaining milk with the sugar in a saucepan; bring to boil; remove from heat.

2. Beat the whole egg, then the yolks into the cornflour mixture. Pour 1/3 of boiling milk into the egg mixture, whisking constantly so that the eggs do not begin to cook.

3. Return the remaining milk to boil. Pour in the hot egg mixture in a stream, continuing whisking.

4. Continue whisking (this is important – you do not want the eggs to solidify/cook) until the cream thickens and comes to a boil. Remove from heat and beat in the butter and vanilla.

5. Pour cream into a stainless steel/ceramic bowl. Press plastic wrap firmly against the surface. Chill immediately and until ready to use.

Pate a Choux – Ingredients

¾ cup (175 ml.) water
6 Tbsp. (85 g.) unsalted butter
¼ Tsp. salt
1 Tbsp. sugar
1 cup (125 g.) all-purpose flour
4 large eggs

Method

1. Combine water, butter, salt and sugar in a saucepan over medium heat. Bring to a boil and stir occasionally.

2. Cook, stirring constantly until the batter dries slightly and begins to pull away from the sides of the pan.

3. Transfer to a bowl and stir with a wooden spoon 1 minute to cool slightly.

4. Add 1 egg. The batter will appear loose and shiny. As you stir, the batter will become dry-looking like lightly buttered mashed potatoes.

5. It is at this point that you will add in the next egg. Repeat until you have incorporated all the eggs.

6. Transfer batter to a pastry bag fitted with a large open tip, pipe choux about 1 inch-part in the baking sheets. Choux should be about 1 inch high about 1 inch wide.

7. Using a clean finger dipped in hot water, gently press down on any tips that have formed on the top of choux when piping. You want them to retain their ball shape, but be smoothly curved on top.

At this point you can brush them with an egg wash, I didn’t bother and they were still tasty and pretty!

8. Bake the choux at 425?F/220?C degrees until well-puffed and turning lightly golden in color, about 10 minutes.

9. Lower the temperature to 350?F/180?C degrees and continue baking until well-colored and dry, about 20 minutes more. Remove to a rack and cool. Make sure you keep an eye on them as they bake, I took mine out after about 10 mins extra because they were beginning to burn on top.

Assembly

You can use spun sugar to assemble your Croquembouche but after reading many stories of burnt fingers and toes I thought I wouldn’t risk it. Instead I used melted chocolate. Yum!
You may want to lay out your unfilled, unglazed choux in a practice design to get a feel for how to assemble the final dessert. For example, if making a conical shape, trace a circle (no bigger than 8 inches) on a piece of parchment to use as a pattern. Then take some of the larger choux and assemble them in the circle for the bottom layer. Practice seeing which pieces fit together best.

Once you are ready to assemble your piece montée, dip the top of each choux in your glaze (careful it may be still hot!), and start assembling on your cake board/plate/sheet. Continue dipping and adding choux in levels using the glaze to hold them together as you build up. (You may want to use toothpicks to hold them in place – see video #4 below).

When you have finished the design of your piece montée, you may drizzle with remaining glaze or use ribbons, sugar cookie cut-outs, almonds, flowers, etc. to decorate. Have fun and enjoy! Bon appétit!

Daring Bakers’ English Pudding Challenge (April 2010)

The April 2010 Daring Bakers’ challenge was hosted by Esther of The Lilac Kitchen. She challenged everyone to make a traditional British pudding using, if possible, a very traditional British ingredient: suet.

I bought my first pudding basin last christmas because I had been charged with the task of making the Christmas Pudding. Now, I absolutely loathe the traditional fruit pudding so I figured that I would make it the only way I KNEW I would like it. With chocolate. Not traditional but very tasty!

I was very excited when I saw that my very first challenge with the Daring Bakers would allow me to use my pudding basin again. Ive never used suet, ive never steamed a dessert, in fact, im not really sure ive ever steamed anything. All ingredients and cooking methods I was new to. Bring it on!

I decided to make the Sussex Pond Pudding as I love lemons and the lemons are looking particularly lovely this season. The idea of steaming a pudding with a whole fruit inside it was also intriguing. I began by sourcing suet mix, which I found at my local supermarket in a box in the baking aisle.

I made the suet pastry according to the instructions on the box. very easy and straight forward.

Lined my pudding basin. (Yes I used kitchen scissors to trim the pastry!)

Added the cubed butter and demerera sugar

Look! A lemon!

Hid the lemon below lots more butter and sugar (possibly a little more than required by the recipe, but since when has extra butter and sugar been anything but good?)

Pop the lid on!

This part I thought would be very difficult, but it turned out pleating the foil and tying it with string was quite easy. My basin didn’t have a lip on it but the string never failed.

I made an impromptu trivet out of scrunched up aluminium foil and plunged by pudding into the boiling water!

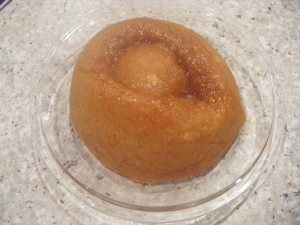
My pud! After 3 and a half hours of steaming. To be honest, I would probably steam it for another couple of hour as its not as golden as I would like.

Another pud! Actually its the same one but de-basined. MMMmmmm….

You can see the lemon in the middle there! Oozing lemony sugary sauce….

Overall, it turned out ok. Some of the pudding was absolutely amazing. The pastry was flaky and tasty with some beautiful lemony sweet sauce. The only problem was that parts of the lemon turned out quite bitter and that tended to overpower the sweetness of the dish. I think that could be overcome by steaming the pud for a few more hours.

While I havent been able to post any more of my pudding attempts, this challenge has certainly inspired me to get creative in the kitchen. Expect more puds, savoury and sweet, large and small over the coming weeks! This was a great challenge that introduced me to many things i’d never think of trying on my own. Thanks Esther, for a truly inspiring challenge!!

So my lovelies, what puddings have you tried to make? Did they work? I think my next attempt is going to be this Very Chocolate Pudding. Just for something different…

Sussex Pond Pudding Recipe – As seen at The Daring Kitchen

Ingredients

1 box suet mix

120g Demerera Sugar

120g Unsalted Butter

1 Large Lemon (try to get unwaxed and thin skinned lemons)

Method

1. Make the pastry according to the instructions on the box

2. Grease your pudding basin with butter and line it with the pastry

3. Cut the butter into small cubes and place half in the basin and cover with half the sugar

4. Wash and dry your lemon, and place it on top of the butter and sugar

5. Cover with the rest of the butter and sugar

6. Cut a disc out of the remaining pastry and cover the pudding filling, folding around the edges of the pastry in order to seal it well

7. Steam for 3.5 hours (I would probably try steaming it for another couple of hours next time)

MAKE SURE YOUR POT DOES NOT BOIL DRY!

8. When you invert your pudding basin to get your pudding out, make sure you do it in a rimmed dish as the sauce may leak out

9. Enjoy!